Wanna learn how to make press on nails to sell? Well keep reading and I’m gonna walk you through the 7 steps to creating a basic press on nail set from start to finish. Also, check out our long-lasting press-on nails that stay put for weeks!
This post may contain affiliate links, which means I/we may receive a commission, at no extra cost to you, if you make a purchase through a link. Please see our full disclosure for further information.

This post is about how to make press on nails.
What you will need:
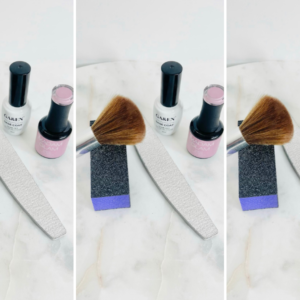
- Artificial Nails (full cover)
- Gel Base Coat
- Nail Stands
- No Wipe Top Coat
- UV Gel Polish Any Color
- Buffer
- Filer
- Mounting Putty
- Alcohol
- Cotton rounds
- UV lamp

1. Choose the nail shape, length and size
First, You will want to select a nail shape. Some common choices are coffin, ballerina, stiletto, oval, square, etc. These shapes come in different lengths, (short, medium, long and extra long) and different sizes. No idea why it makes me so excited thinking about all the different types of nail shapes you can choose from, but hey! Ok, so back to what I was saying…now let’s say we know our size and we are a size medium. Grab two nails in each of the following sizes: 1, 5, 4, 5, and 8.
(If you’re unsure of sizing or how to measure, check out this post here to find your size.)
2. Buff your press on nails
You’ll want to use your buffer to buff each of the nails in order to get rid of the shine on the top of the nails. You’ll notice a little piece of plastic at the tip of each nail, let’s lightly file the little tab off the tips of each nail, using a regular file in a straight across back and forth motion. When filing the tip, remember we want to file just light enough to remove the little piece on the tip. I like to do this step before putting the nails on the nail stand, though some prefer to do this step while the nails are on the nail stand. For me, it’s just easier to really get a good buff and file going without the nails moving around on the stand.

3. Wipe each nail with alcohol
You won’t want to skip this step because it could cause your polish to look bumpy and we don’t want that at all. LOL
We want a nice smooth nail and this is one step in achieving that. So go ahead and wipe each nail using your alcohol and your cotton rounds.
4. Prepare your nail stands
Now, you’ll want to get your nail stands ready before putting the nails on. Here is where you’ll need the mounting putty. The mounting putty comes in many different colors and is just a reusable putty. It grabs onto whatever you place it on and holds it enough to keep it in place, but also can be removed with ease. Lol basically, it’s magic!
I would use little balls of the mounting putty to put on top of the individual nail stands. This will hold your nail in place while you polish the nails. This will also help to adhere your nails to the nail stand. You’ll just need a nice little ball, something like the pic below.
Once you get used to doing press on nails you may decide you like to have more or less of the amount I use, I think it’s really just preference. You just want to make sure it’s enough to get the job done.


Tip: When you purchase your nail stands I would buy more than one set. Trust me when you start selling, you’ll be glad you did! It will save you tons of time!


5. Start with a gel base coat.
Now, that the nails have been buffed and dry after the alcohol wipe-down, Lol, you can place them on the nail stands as you see mine in the picture below.
Make sure to press down just a little to get them really sticking together and not moving around. I like to put them in order from thumb to pinky, so nothing gets confusing depending on the design I’m doing.
Before you get to polishing, it helps to start with a nice base coat. I would apply 1-2 coats. The base coat helps to give the polish something to grab onto. This is one of the ways of keeping your polish from lifting. The sticky base coat adheres to the nail and the polish adheres to the base coat. It all works together for a nice smooth nail, which is what we want.


Now we are finally ready to get to the fun part…Polishing!!
6. Add your polish
Follow this pattern when applying the gel polish to the nail. The best way to polish the nail would be to start in the center of the nail from cuticle to tip. The polish shouldn’t be dripping from the brush, if so it’s definitely too much!
Then, swipe your brush along the left side from cuticle to tip and do the same to the right side of the nail. You’ll want to do this in smooth motions.
Tip: When adding polish make sure to apply at least 2 coats, personally I recommend about 4 coats. Just make sure not to hold the brush at an angle and use thin coats. The thin coats will help to prevent the polish from looking bulky. The number of thin coats will help build a stronger, longer-lasting nail.
Afterward, always check underneath each nail to make sure there isn’t any polish that has spread underneath the nail. If so, you’ll want to remove the excess before placing it under the UV lamp. Then, always let the polish settle on the nail for a few seconds before placing it under the UV Lamp for 60 seconds, to avoid bumps or waves in the polish.
I would recommend polishing all the nails on the first stand and then placing that stand under the UV lamp for 60 seconds before starting on the next stand. This way you can always have one set curing while you work on the other. The goal is to work smarter, not harder. 🙂
Lingo: Think of curing as simply the process of drying the polish on the nail.
Depending on how opaque the color of the gel polish is, you may want to do another thin coat of gel polish on all the nails and curing for another 60 seconds.
Lingo: Opaque means you can’t really see through the polish and therefore
you don’t have to use as many coats to cover the nail.
7. Applying the top coat
Now that all the nails are dry from the second coat of gel polish, the last step in the process is to apply a nice juicy (LOL) layer of a no-wipe gel top coat to give the nails some shine.
Lingo: No wipe just refers to the sticky residue that some gel top coats leave behind and you would normally have to wipe off with alcohol. When you purchase the “no-wipe” top coat, you “shouldn’t” have to do this.
All Done!
I hope you guys found this tutorial easy to follow along and that I have inspired you to go ahead and try creating your first set of press-on nails. It may seem like a lot at first, but trust me guys, it gets easier and easier. In no time you’ll be a pro!
Don’t forget to check out our long-lasting press-on nails that stay put for weeks!
You can check out the video here.
This post is about how to make press on nails.
Related Posts
You may also find the following posts helpful.
How To Start A Press On Nail Business
20 Press On Nail Supplies Every Press On Nail Artist Should Own
The Best Packaging Ideas For Your Press On Nail Business


Am a Nigerian,I need help getting my presson nails essential.
Hi if you’re having an issue getting your items shipped from Amazon to your country, I would maybe look to other sites like Aliexpress.com. I’ve purchased a few things from their site, the items are really cheap, but the only downside is it takes a few weeks to receive them. You could also try doing a google search on “does amazon ship to nigeria” and see what you can find out. Hope this helps, good luck!
Thank you this is so helpful, I stay in Nigeria too and I hope to get products from Aliexpress
No problem!