
This site contains affiliate links, view the disclosure for more information

If you’ve ever watched a nail artist on TikTok and wondered how they get those crisp lines or tiny floral details—spoiler alert—it’s not just talent. It’s the brushes. Whether you’re just getting started with nail art at home or want to upgrade from the basic tools in your kit, knowing which nail art brushes to use (and how to actually use them) can make a huge difference.
This guide breaks down the 7 essential nail art brushes every beginner needs—plus simple tips on how to use each one to create designs that look way more advanced than they are.
This post is all about nail art brushes every beginner needs.
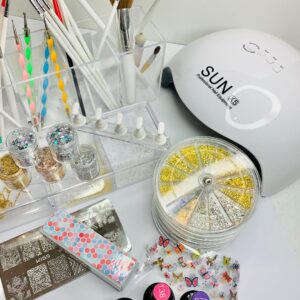
Nail Art Brushes
1. Detail Brush
Best For: Intricate lines, lettering, and tiny designs
Why You Need It: The fine tip gives you full control for things like smiley faces, outlines, or minimalist art.
Pro Tip: Use short strokes and rest your pinky on the table for more precision.
2. Striping Brush
Best For: Long, straight lines and stripes
Why You Need It: This brush is long and super skinny, making it perfect for lines, plaid patterns, or even French tips.
Pro Tip: Load the brush with polish and keep your hand steady—let the length of the brush do the work.
3. Flat Brush (or Shader Brush)
Best For: Color blocking, ombré, or blending
Why You Need It: The flat shape makes it great for filling in larger spaces or blending two shades.
Pro Tip: Dab off excess polish before applying to avoid thick blobs.
4. Fan Brush
Best For: Glitter fades, marbling, and smoky effects
Why You Need It: Its wide, fanned-out shape can add texture or soft gradient effects.
Pro Tip: Try tapping it lightly into glitter and brushing it from the tip of the nail downward for an easy glitter fade.
5. Angled Brush
Best For: Clean-up and precision painting
Why You Need It: While not always used for art itself, this brush is key for getting a salon-level finish. Dip it in acetone/alcohol to clean up the edges of your cuticle area.
Pro Tip: Choose one with firm bristles so it holds its shape.
6. Dotting Tool (Yes, it’s technically not a brush—but you need it!)
Best For: Dots, flowers, animal print
Why You Need It: It’s the easiest tool to master and can be used for dozens of quick designs.
Pro Tip: Use different sized ends (most are dual-ended) to get different effects.
7. Round Brush
Best For: Petals, swirls, and more fluid designs
Why You Need It: It has a slightly thicker body than the detail brush and works well for more organic, curved shapes.
Pro Tip: Light pressure will give you thinner strokes; press harder for bolder shapes.


You don’t need a 20-piece set to get started. These seven brushes (plus a good dotting tool) are more than enough to create pro-looking designs at home. Once you get the hang of how each one moves and reacts with polish, you’ll be surprised by how easy nail art becomes.
Quick Tip: Look for nail brush sets labeled specifically for gel or nail art, and always clean your brushes with acetone or alcohol after every use.
This post is all about nail art brushes every beginner needs.


Leave a Reply